> ## Documentation Index
> Fetch the complete documentation index at: https://help.visualcare.com.au/llms.txt
> Use this file to discover all available pages before exploring further.
# Transport runs
> How to schedule and manage community bus runs and transport with multiple pick-up and drop-off destinations
Transport runs let you schedule and manage community bus runs or similar trips where there are multiple pick-up and drop-off destinations for multiple clients. Each run can include a driver, vehicle, and a series of stops ("drops") with clients assigned to each.
## Creating a new transport run
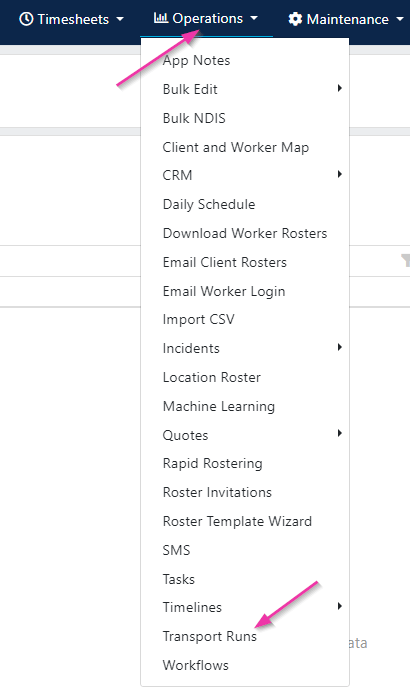
Go to **Operations** → **Transport Runs**.
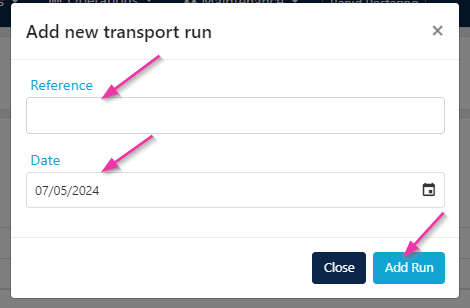
 Click **Create New Roster**. Enter a relevant name in the **Reference** field, select a date for the run, and click **Add Run**.
 Once the run is created, add additional information at the top of the page:
| Field | Description |
| ---------------------- | -------------------------------------------------------------------------------------------- |
| **Date of run** | Update the date if needed |
| **Reference** | Update the name of the run |
| **Transport Category** | Select a category (set up under **Maintenance** → **Categories** → **Transport Categories**) |
| **Start Time** | Start time of the run |
| **Finish Time** | Finish time of the run |
| **Driver** | Select a worker as the driver |
| **Vehicle** | Select a vehicle (set up under **Maintenance** → **Vehicles**) |
Click **Save** to save the changes.
Once the run is created, add additional information at the top of the page:
| Field | Description |
| ---------------------- | -------------------------------------------------------------------------------------------- |
| **Date of run** | Update the date if needed |
| **Reference** | Update the name of the run |
| **Transport Category** | Select a category (set up under **Maintenance** → **Categories** → **Transport Categories**) |
| **Start Time** | Start time of the run |
| **Finish Time** | Finish time of the run |
| **Driver** | Select a worker as the driver |
| **Vehicle** | Select a vehicle (set up under **Maintenance** → **Vehicles**) |
Click **Save** to save the changes.
 To duplicate an existing transport run, click the **Clone** button at the top of the page. This creates a copy with the same settings and stops.
## Adding drops
Drops are the individual stops within a transport run. Each drop can have multiple clients.
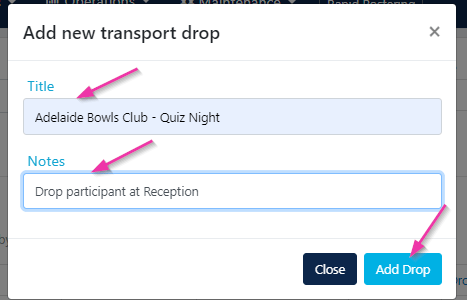
Click **Add Drop** and add relevant notes for the driver.
To duplicate an existing transport run, click the **Clone** button at the top of the page. This creates a copy with the same settings and stops.
## Adding drops
Drops are the individual stops within a transport run. Each drop can have multiple clients.
Click **Add Drop** and add relevant notes for the driver.
 Click **Add Client to Drop**, fill in the relevant fields, and click **Add Client**.
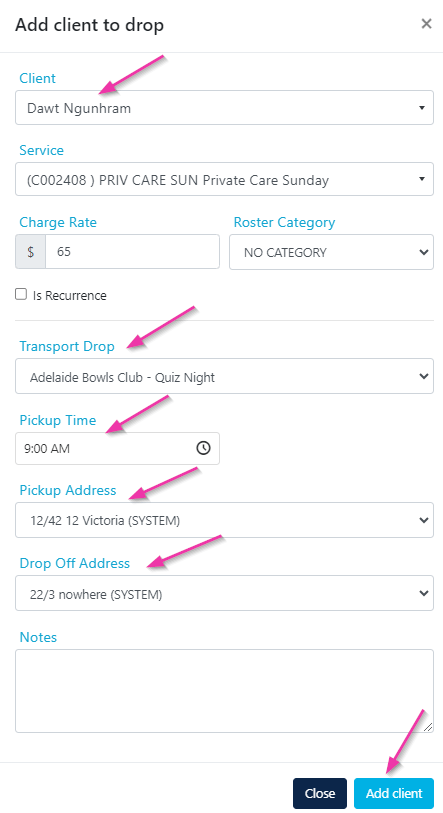 There are three types of addresses you can use for pick-up or drop-off:
| Address type | Description |
| ------------ | ---------------------------------------------------------------------------------------- |
| **Home** | The client's main address from their profile |
| **Client** | An address specific to that client, set up under the client profile's **Addresses** tab |
| **System** | An address not linked to a specific client, set up under **Maintenance** → **Addresses** |
## Managing clients on a drop
Once clients are added to a drop, you can manage them using the options available:
There are three types of addresses you can use for pick-up or drop-off:
| Address type | Description |
| ------------ | ---------------------------------------------------------------------------------------- |
| **Home** | The client's main address from their profile |
| **Client** | An address specific to that client, set up under the client profile's **Addresses** tab |
| **System** | An address not linked to a specific client, set up under **Maintenance** → **Addresses** |
## Managing clients on a drop
Once clients are added to a drop, you can manage them using the options available:
 * **Edit** - update client details for this drop, make changes and click **Save**
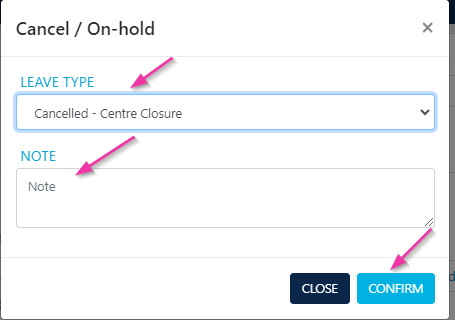
* **Add On Hold** - if a client is unavailable, mark them as on hold by selecting a **Leave Type** and adding notes
* **Delete** - remove the client from the drop entirely
* **Edit** - update client details for this drop, make changes and click **Save**
* **Add On Hold** - if a client is unavailable, mark them as on hold by selecting a **Leave Type** and adding notes
* **Delete** - remove the client from the drop entirely
 ## Adding workers to the run
Multiple workers can be added to a transport run alongside the driver.
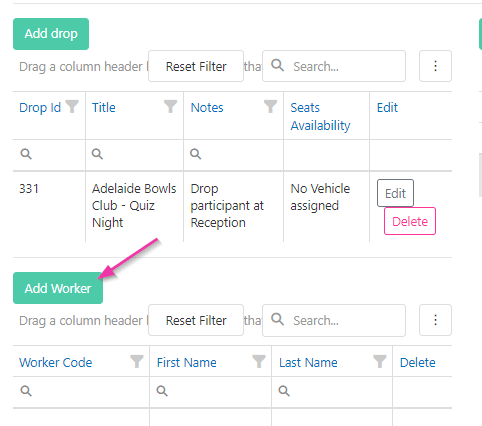
Click **Add Worker**, tick the workers to be added, and click **Add Selected Workers**.
## Adding workers to the run
Multiple workers can be added to a transport run alongside the driver.
Click **Add Worker**, tick the workers to be added, and click **Add Selected Workers**.
 ## Transport run report
Once all drops have been created and clients are added in the correct order, click **Run Report** in the top right corner to generate the transport run report.
If a customised Word tag template has been added to your database, use the **Export to Word** feature to export the report in your customised format.
## Transport run report
Once all drops have been created and clients are added in the correct order, click **Run Report** in the top right corner to generate the transport run report.
If a customised Word tag template has been added to your database, use the **Export to Word** feature to export the report in your customised format.
 ## Running into issues?
See [Scheduling troubleshooting](/troubleshooting/rostering-issues) for common errors and fixes.
## Related articles
Set up vehicles and assign them to shifts
Roster group activities using location rosters
View client and worker locations on a map
## Running into issues?
See [Scheduling troubleshooting](/troubleshooting/rostering-issues) for common errors and fixes.
## Related articles
Set up vehicles and assign them to shifts
Roster group activities using location rosters
View client and worker locations on a map